 » Site Navigation » Site Navigation | | | | » Recent Threads | | | |  |  |  | |  04-07-2010, 02:01 AM 04-07-2010, 02:01 AM | #1 | | Senior Member Join Date: Jun 2009 Location: Miami, FL Posts: 874 |  Y connector Y connector
how can i replace the Y connector behind the cylinder head.. is there an easy way to do this... its a PITA and i really dont want to take half the engine bay apart |  |  | | 04-07-2010, 03:20 AM | #2 | | Senior Member Join Date: Apr 2007 Location: Elizabeth City, NC Posts: 3,877 |
Take the battery, battery tray, plug wires, and plug wire heat shield out. Remove the parts covering the microfilters and the screws holding the wiring harness up.
Look at the hole in the rear corner of the engine bay in between the motor and where the battery sits. I put my entire arm up to my elbow in that hole and was able to bend my arm and easily get at the two screws holding the Y connector on. I was able to use a small 1/4" ratchet and the appropriate socket.
Getting the hoses on and off may be tricky but I suspect it is possible. (I had the upper and lower intake removed for that part) __________________ ~Dave~
98 328ti Morea Grun slicktop
11 128i space gray slicktop
13 JGC WK2 Deep Cherry
Search | RealOEM | | | | | 04-07-2010, 04:08 AM | #3 | | Senior Member Join Date: Dec 2009 Location: Chicago, IL Posts: 181 |
Quote: Originally Posted by spidertri  Take the battery, battery tray, plug wires, and plug wire heat shield out. Remove the parts covering the microfilters and the screws holding the wiring harness up.
Look at the hole in the rear corner of the engine bay in between the motor and where the battery sits. I put my entire arm up to my elbow in that hole and was able to bend my arm and easily get at the two screws holding the Y connector on. I was able to use a small 1/4" ratchet and the appropriate socket.
Getting the hoses on and off may be tricky but I suspect it is possible. (I had the upper and lower intake removed for that part) | +1 on what spidertri said. That is exactly how I did it when I rebuilt my cooling system. Make sure you put some RTV Silicone on the seal. Not really necessary but it gives you an extra precaution against leaks. Remember it takes 1 hour to cure before fully tightening the two bolts. Then 24 hours to cure completely after that. Good luck  __________________
B.M.W. = Be My Wife | | | | | 04-07-2010, 05:30 AM | #4 | | Senior Member Join Date: Jun 2009 Location: Miami, FL Posts: 874 |
Quote: Originally Posted by spidertri Take the battery, battery tray, plug wires, and plug wire heat shield out. Remove the parts covering the microfilters and the screws holding the wiring harness up.
Look at the hole in the rear corner of the engine bay in between the motor and where the battery sits. I put my entire arm up to my elbow in that hole and was able to bend my arm and easily get at the two screws holding the Y connector on. I was able to use a small 1/4" ratchet and the appropriate socket.
Getting the hoses on and off may be tricky but I suspect it is possible. (I had the upper and lower intake removed for that part) | plug wires, and plug wire heat shield? yeah if i knew what those are i so would.. im not really familiarized with the names of everything in the engine bay since im just starting to do everything myself and startin to take on the mech job .. but yeah i removed the battery/tray i also removed the upper intake trying to make some more room to reach the connector but my hand still wont fit and is there like fiber glass behind the engine block or something cause sh*t my hand is itching like crazy.. and it feels like i got tiny lil pieces of glass stuck all over my fingers.. but yeah since i couldnt get the connector off i put the intake back together | | | | | 04-07-2010, 05:40 AM | #5 | | Senior Member Join Date: Dec 2009 Location: Chicago, IL Posts: 181 |
Don't worry about removing all the plug wires and heat shield. The battery and battery cover is all that you need to remove on that side.
You said you took off the upper intake manifold. I hope you replaced the two gaskets that are in between the upper and lower intake manifold? Anyways, where did you have trouble fitting your hand in? My hand size is "Large" and I fit just fine sort of. It helps if you stand in the engine bay [i.e. take the fan out and stand in the spot between the radiator and your engine]. __________________
B.M.W. = Be My Wife | | | | | 04-07-2010, 05:51 AM | #6 | | Senior Member Join Date: Jun 2009 Location: Miami, FL Posts: 874 |
ill look for this hole you guys are talking about tomorrow and about those gaskets.. uhm i didnt... and why do u say u hope i did.. u startin to scare me there  ohh and out of topic the rusty bolts for the Cat are all out but one... that last one is givin me a battle... and since i have a pregnant GF i cant make much progress..  | | | | | 04-07-2010, 12:45 PM | #7 | | Senior Member Join Date: Jan 2009 Location: Columbia MD Posts: 215 |
Two things to make your life a bit easier when you're working back there-
1- Put the bonnet into 'maintenance mode'. On the upper mount on the left side hood strut, there is a single bolt (10mm, I think). Remove it. This will allow the hood strut top mounts to flip downwards. The hood will open up at nearly a 90 deg angle, giving you more room and light to work with.
2- Don't be afraid to stand in the engine bay, between the radiator and the front of the engine. Seriously. It makes messing with that pipe and the hoses much easier. Be careful not to kick the radiator if you're not replacing it. __________________ *Except 318ti 
'97 318ti M-Sport
'95 M3
BMWCCA | | | | | 04-07-2010, 04:24 PM | #8 | | Senior Member Join Date: Jun 2009 Location: Miami, FL Posts: 874 |
okay about to head downstairs to wrench around but yeah thanks for the tip and i will definitely wont kick it | | | | | 04-07-2010, 05:49 PM | #9 | | Senior Member Join Date: Apr 2007 Location: Elizabeth City, NC Posts: 3,877 |
plug wires= the spark plug wires and coil pack.
plug wire heat shield = the metal tray that is attached to the passenger side of the engine that the spark plug wires are routed through.
I think removing the spark plug wires provides a good deal of room and is necessary. __________________ ~Dave~
98 328ti Morea Grun slicktop
11 128i space gray slicktop
13 JGC WK2 Deep Cherry
Search | RealOEM | | | | | 04-07-2010, 07:30 PM | #10 | | NOBODY F's with the Jesus Join Date: Oct 2006 Location: Ventura California Posts: 7,824 |
This really pisses me off. I hate it when people chime in and don't know what the hell they're talking about. There's absolutely no reason to remove the upper intake manifold. It's a royal PITA and it doesn't even provide better access to this particular part. | | | | | 04-07-2010, 07:54 PM | #11 | | Senior Member Join Date: Nov 2004 Location: Minneapolis Posts: 1,587 |
I'd say take the manifold off, but only to replace the connector on the side of the block at the same time. I don't see any reason not to replace it at the same time (unless it's been done before). My side-of-block connector was cracked when I took it off. It would have failed before too long. | | | | | 04-07-2010, 07:56 PM | #12 | | Senior Member Join Date: Jun 2003 Location: Halethorpe, MD Posts: 1,028 |
It is possible to reach that connector from underneath the car as well. It's not easy, but it's possible. You can definitely remove and replace the plastic fitting, but the hoses and clamps will probably require access from above. Last time I did this I had a friend up top keeping an eye on things and moving stuff around as necessary. | | | | | 04-07-2010, 07:59 PM | #13 | | Senior Member Join Date: Mar 2005 Location: Detroit, MI Posts: 585 |
Quote: Originally Posted by cooljess76 This really pisses me off. I hate it when people chime in and don't know what the hell they're talking about. There's absolutely no reason to remove the upper intake manifold. . | +1. I did it without removing the manifold or battery. I just removed the microfilter area and unbolted the wire to move them out of the way. Best tool to have is 1/4" wobble extensions. __________________  | | | | | 04-07-2010, 08:05 PM | #14 | | Senior Member Join Date: Jun 2009 Location: Miami, FL Posts: 874 |
Quote: Originally Posted by cooljess76 This really pisses me off. I hate it when people chime in and don't know what the hell they're talking about. There's absolutely no reason to remove the upper intake manifold. It's a royal PITA and it doesn't even provide better access to this particular part. | yeah i know i relized that yesterday after i did it and noticed that it was really pointless.. but i did the job today with just removing the battery and battery tray it was really easy besides that it was just a royal PITA puttin the hoses back on the connector. this is how the old connector looked like before i removed it causin major overheating 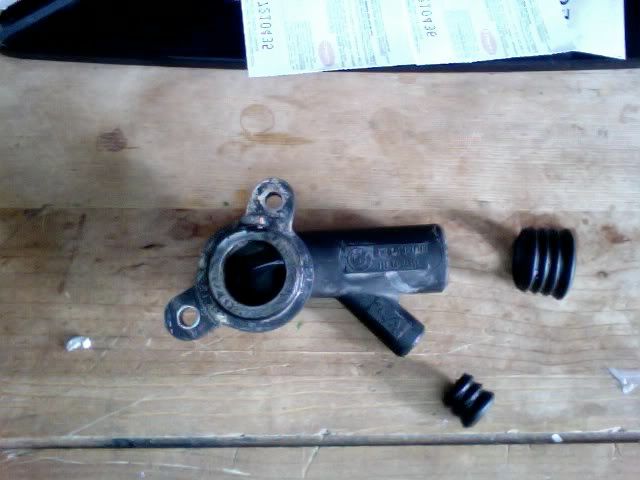 | | | | | 04-07-2010, 09:10 PM | #15 | | Senior Member Join Date: Jul 2009 Location: MD/PA/DC Posts: 1,629 |
Well Jess, why don't you add that little bit of info to the FAQ on the cooling system rebuild and the sticky in the maintenance forum. Then us retards won't give the wrong info. __________________  No more ti. No more ti. | | | | | |
| Currently Active Users Viewing This Thread: 1 (0 members and 1 guests) | | |
 Posting Rules Posting Rules | You may not post new threads You may not post replies You may not post attachments You may not edit your posts
HTML code is Off
| | |
|


 Linear Mode
