 » Site Navigation » Site Navigation | | | | » Recent Threads | 1999 M3 Swap 09-07-2023 10:10 PM Yesterday 08:18 PM 6 Comments, 317,908 Views | | | |  |  |  | |  08-15-2006, 03:01 AM 08-15-2006, 03:01 AM | | | Senior Member Join Date: Nov 2004 Location: Minneapolis Posts: 1,587 |  M42/44 / 318ti Valve Cover Gasket DIY. PICS! M42/44 / 318ti Valve Cover Gasket DIY. PICS!
* DIY * Replace the Valve Cover Gasket and Spark Plugs on the M42/44 Engine. Parts Needed: M42/M44 Valve Cover Gasket: 11121721876 Rubber Bolt Washers (15x): 11121721879 Spark Plug Hole Gasket w/Bolt Hole: 11121721475 Spark Plug...
Last edited by 1996 328ti; 10-12-2013 at 08:54 PM. Reason: Included M42. |  |  | | |
#15. Clean half-moon surfaces with rubbing alcohol or the like, and apply small beads of sealer. I used Permatex High Temp RTV. I didnt know how much to use, so I guessed.  --  | | | | |
#16. Install new rubber washers on the two smaller valve cover bolts. Reinstall valve cover as perfectly aligned and straight down as possilbe. Hand thread the two smaller bolts (spark plug channel) to keep the valve cover in place. #17. I used a mirror to make sure the back side (with half moons) were properly seated. You can see a tiny bit of the RTV squeezing out. The RTV instructions said to reinstall the valve cover and let the RTV squeeze out just a bit, then let it cure for a full hour. I used this time to clean up a bit and to install the new rubber washers on the remaining bolts. I found it easiest to use a diagonal cutter and cut away the old rubber washers from the bolts. Reinstalling the new washers is a PIA. I needed grease on some to get them to slide on easily. I should have cleaned that mirror first   --  | | | | |
#18. After the RTV has cured, I torqued the valve cover bolts to a bit less than the 10 nm spec. #19. Install new spark plugs. Use the included BMW tool and hand thread the spark plugs until fully seated. The torque spec for the plugs was 18 ft-lbs, but that seemed a bit much and I stopped at about 10 ft-lbs. #20. Plug in the valve cover breather hose.  | | | | |
#21. Reinstall the ignition set. Make sure you rebolt the plug wire channel/heat shield to the outside of the cover. See Pics in Step #7. BTW, it was much easier to install than remove. #22. Reinstall the wiring harness ducting, if you removed it. #23. Reinstall the battery box, battery, and positive battery cable, if you removed it. #24. Reinstall spark plug channel cover. All back together!  | | | | |
#25. Reconnect negative battery cable. Check oil level, and start it up.
Check for leaks. If all is well, take it for a short drive and then check for leaks again.
--------------------------------------
Well, that's how I did it. First draft BTW, so I may have omitted stuff and made some errors in my typing. No guarantees on anything, so work at your own risk!!
Recommendations:
• Do this shortly before you need an oil change. You're certain to get a small amount of debris into the cam/valve area.
• Use lint-free rags when wiping oil seal areas. The less lint and debris that gets into the engine, the better.
• Do this only when the engine is cold. | | | | |
My first roadtrip after the new plugs got me a new personal gas mileage record. 33.4 mpg. That was with numerous stops too 34 mpg should be no problem with a non-stop run. | | | | | cover gasket tutorial
Thanks for the excellent post. I found oil in the first and second plug wells today, so I'm putting this job on my list. | | | | |
Does anyone know what the plates are called that the oil return tubes are attached to. I'm getting my valve cover powder coated and had to take everything off. The rubber gasket that is on the one plate is very dry and I would like to replace it since everything is ripped apart. I can't find anything on real OEM that shows what there are and running the one part number I can find on RealOEM doesn't come up with anything. Quote: Originally Posted by CirrusSR22  #13. Underside of valve cover. Pull old gaskets away and clean up cover to your liking. Insert new gaskets. Freshly Pulled 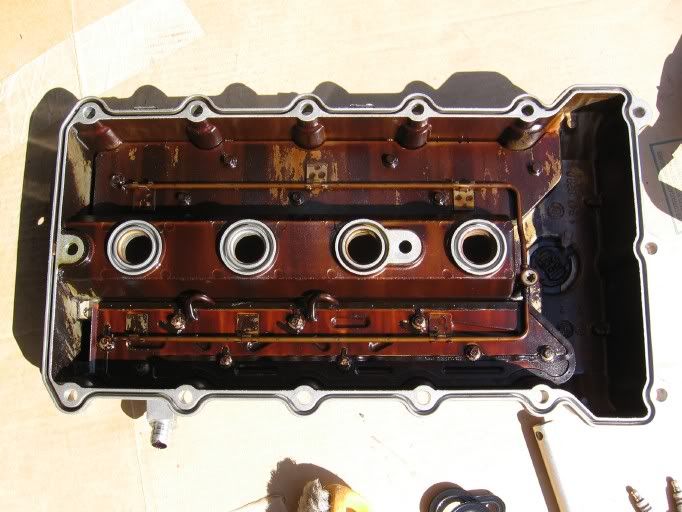 New gaskets installed and ready to reinstall.  | | | | By bbbmw on 01-16-2007, 05:41 AM |
Great posting! thanks much for the detail, and all the pics. In looking for a gasket set, I found the dealer is about 2-3x the price of the non-BMW parts houses. But, the oil supply seal is a dealer-only part, and not carried by the BMW dealers (I called east to west coast). It is a 2-3 day delivery for this $5.00 part. Be sure you have all parts before this surgery - my ti is now immobilized until I get that part. | | | | |
Yeah, I'd get the new oil supply seal for sure. I contemplated not changing it, but after seeing how hard it was, I was glad I replaced it. Cheap insurance for ensuring a good flow of oil to the cams. | | | | |
Quote: Originally Posted by b.u.ti-ful Thanks for the excellent post. I found oil in the first and second plug wells today, so I'm putting this job on my list. | ditto. I found a gasket at bav auto but, cant seem to find the gasket for the oil tube. Any hints on where to find it if dealers dont carry it? | | | | |
I think I got it from PelicanParts.com | | | | |
Yep, found everything I needed at PelicanParts.com. It totaled something like $51 with 2-day shipping. | | | By Jammu on 07-18-2007, 02:06 PM |
Excellent DIY, just booked maintenance for this in our local workshop. And now i can collect all needed parts.
Oil Supply Seal: 11121247948, cant get this part anywhere in Finland cos M44 engine is very very rare here (didn't import it here much) so need to order it from Germany or Sweden, but without this DIY my car would stand in repair shop couple of days, so thanks ;D | | | | |
Awesome write-up...just did this today. Your loss was my gain in pointing out to do the microfilters as well, so thanks for that!
Only thing I did badly was I forgot to put the really thin plastic baffle back inside the microfilter assembly. Is this bad? Haha... | | | | |
| Currently Active Users Viewing This Tutorial: 1 (0 members and 1 guests) | | |
 Posting Rules Posting Rules | You may not post new threads You may not post replies You may not post attachments You may not edit your posts
HTML code is On
| | |
|


 Linear Mode
