318ti.org forum

Go Back   318ti.org forum > Technical, Maintenance and Modifications > Knowledge Base

Notices

Knowledge Base How to articles and things explained.

.
» Recent Threads
M50+manual swap bastard...
03-01-2024 10:00 PM
Last post by Andy318
Yesterday 02:34 PM
3 Comments, 47,980 Views
Cali Top owners: How...
07-14-2014 04:29 PM
Last post by Trusted-1
03-15-2024 02:37 AM
2 Comments, 44,950 Views
FOR SALE: 82k mile 1995...
03-15-2024 01:24 AM
Last post by di318
03-15-2024 01:24 AM
0 Comments, 40,595 Views
BMW E36 Compact rear...
03-13-2024 12:56 PM
Last post by BMW Welsh rally
03-13-2024 12:56 PM
0 Comments, 51,437 Views
WTB: 318ti with...
04-20-2022 08:57 AM
Last post by di318
03-10-2024 08:08 PM
21 Comments, 248,687 Views
The 318ti OBD-II engine...
10-19-2006 06:48 PM
Last post by Cybersid13
03-09-2024 02:12 PM
209 Comments, 681,961 Views
Comment Share/Bookmark
 
Tutorial Tools Display Modes
DIY Leather seat repair and refinishing...
wolferj
Published by wolferj-RIP
03-12-2009
Default DIY Leather seat repair and refinishing...

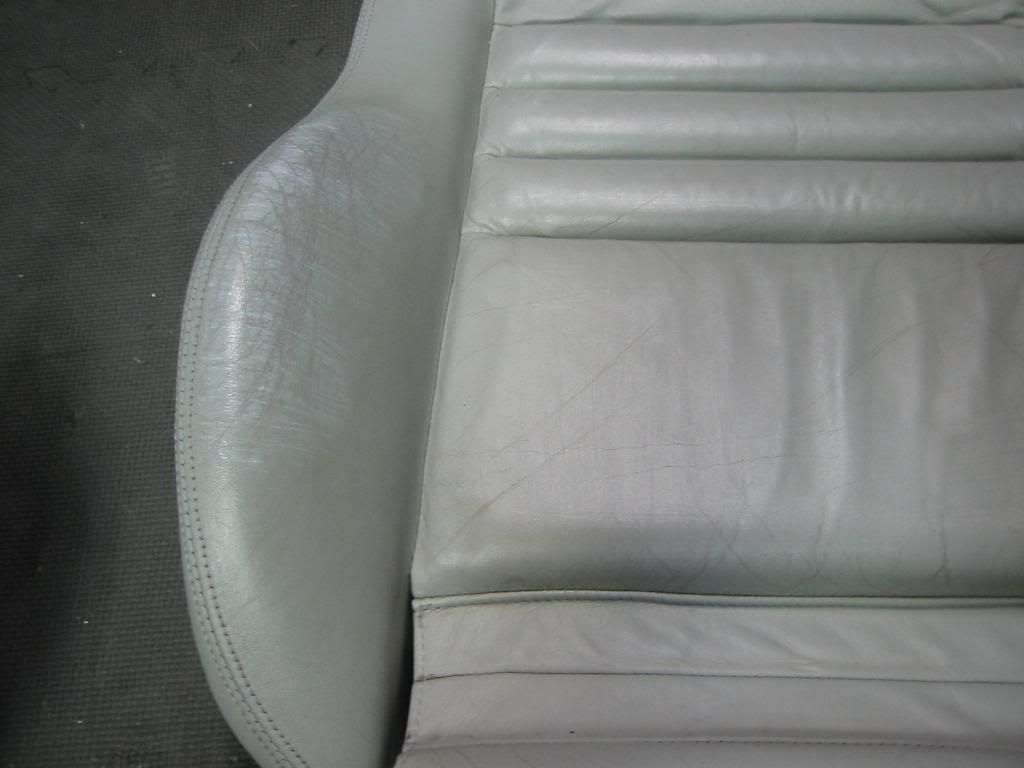
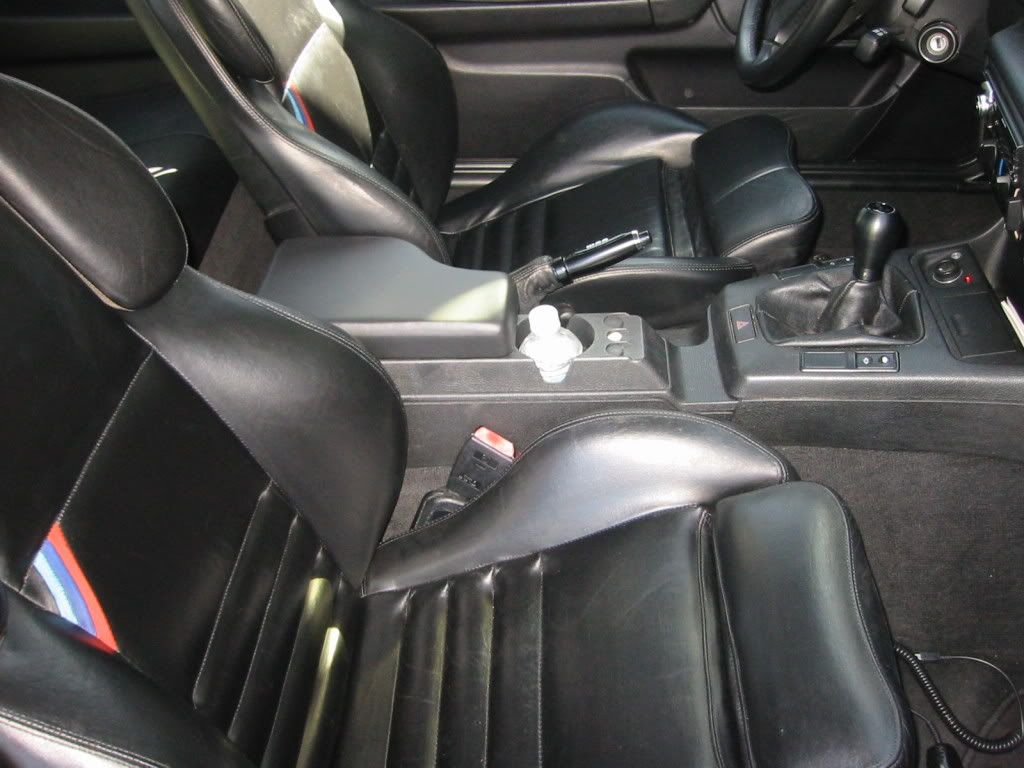
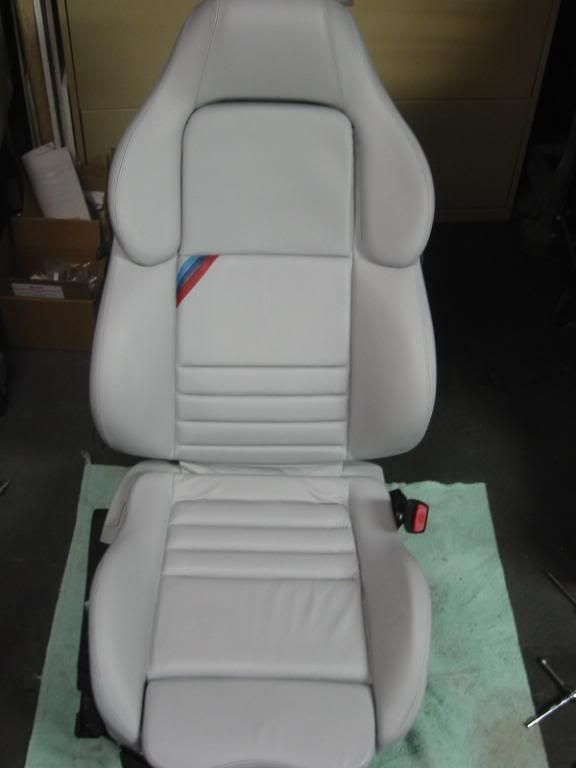
(I know this is a re-post from here (http://318ti.org/forum/showthread.php?t=25597) but I did more repairs and re-did the black seats as well as panel and steering wheel refinish/repair and wanted to post a more complete DIY.)


The dove Vader seats in my coupe were cracked, torn, worn through in spots, and filthy.

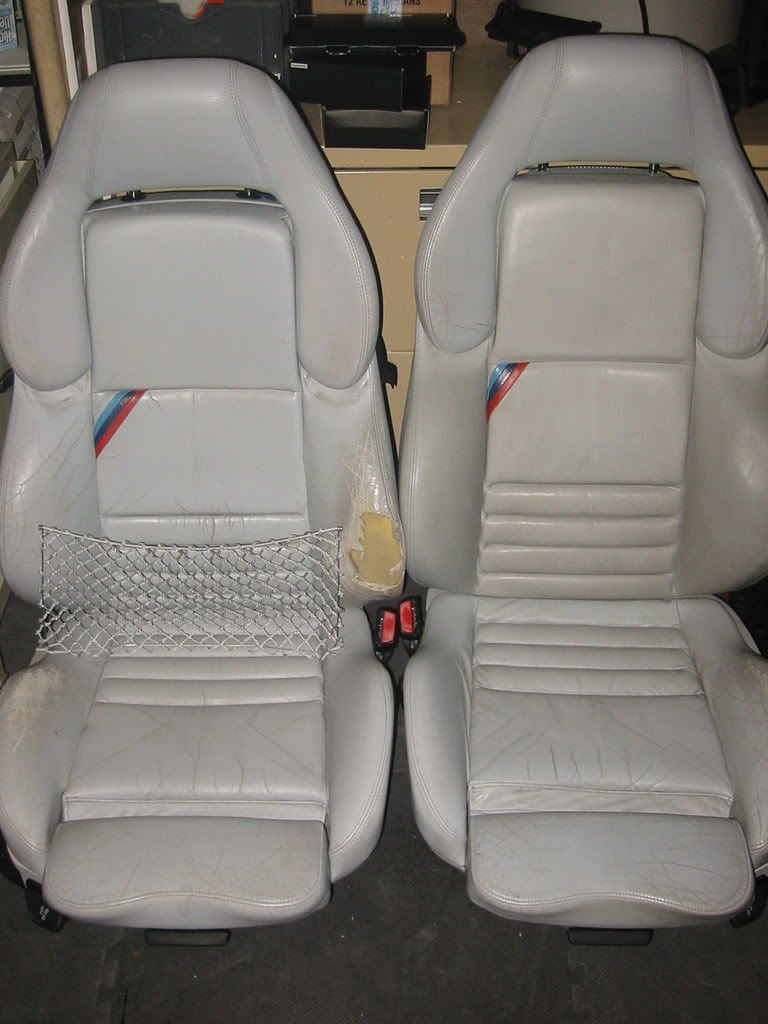
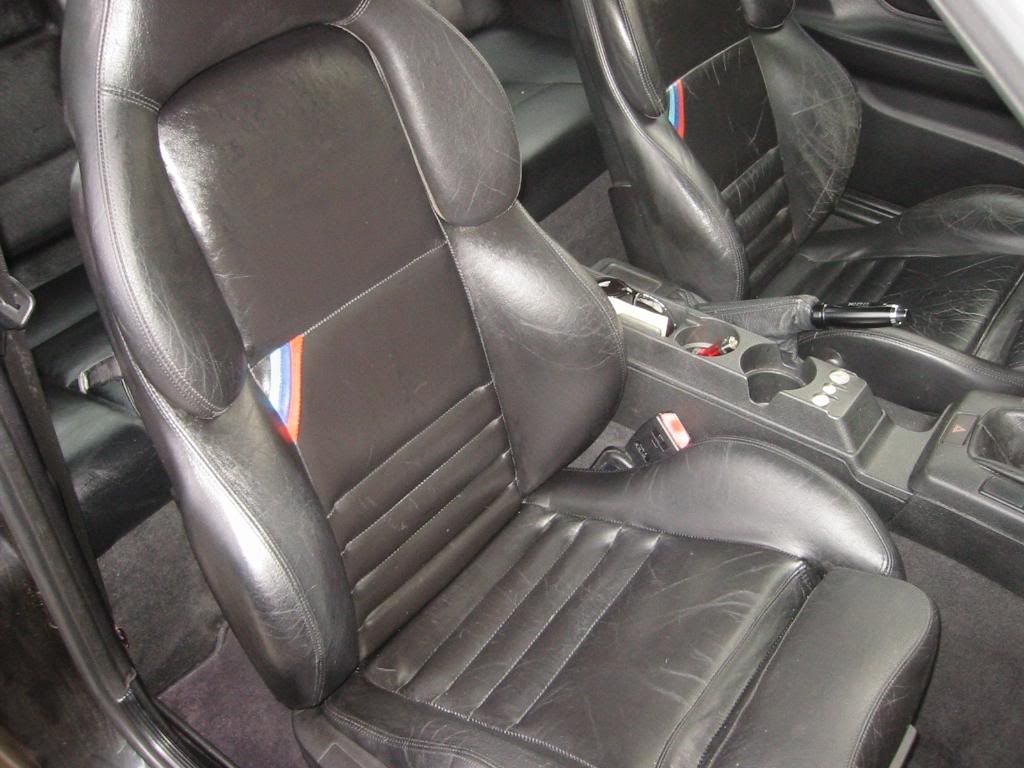
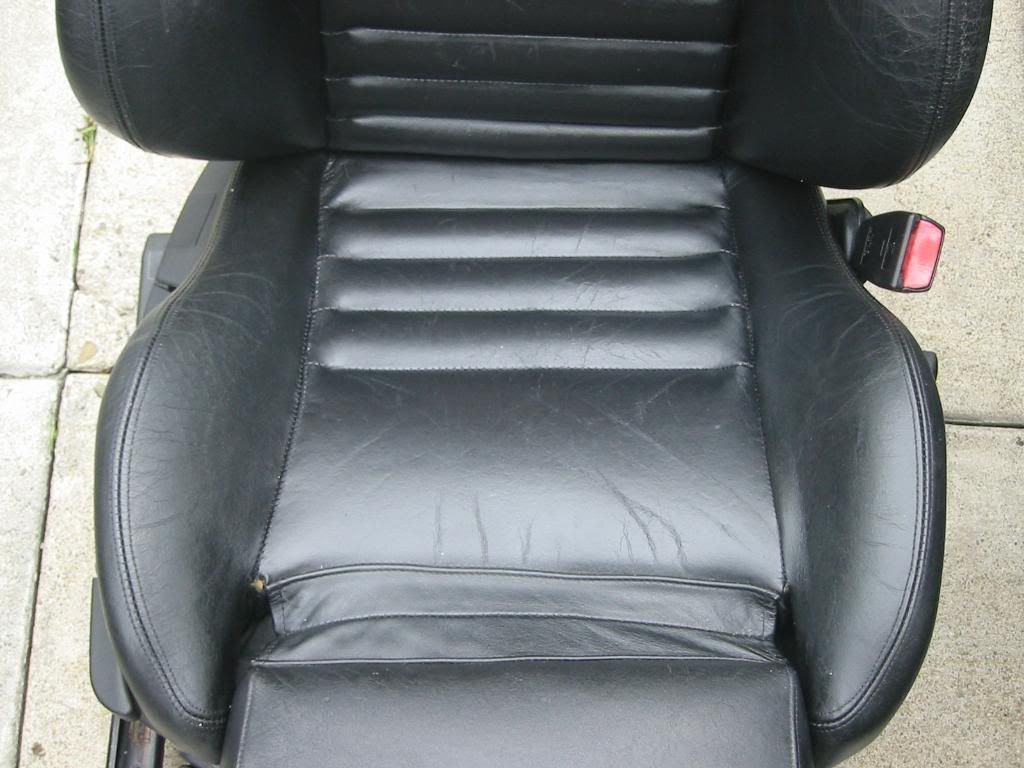
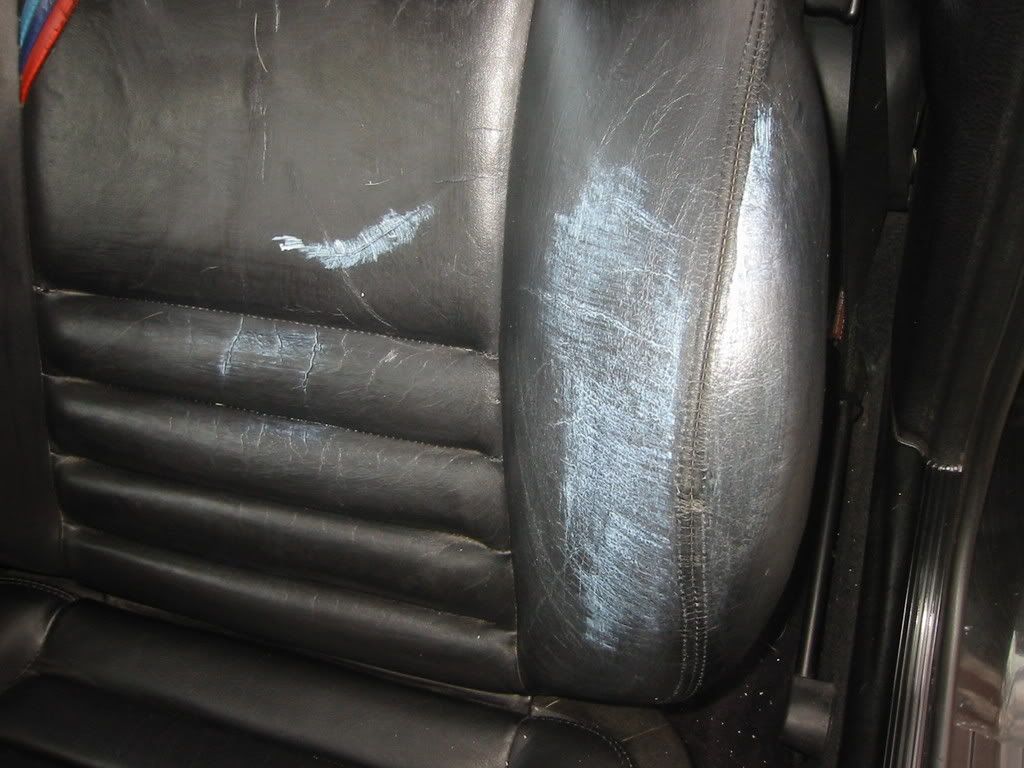
The black Vader seats I put in my ti a year ago were hard and had some cracking.


So what to do? These seats are becoming rarer and more expensive everyday and the newest examples are over 10 years old, so a refresh was the best option for my seats…

Here are the products and tools I used;
Leather Master leather filler, Leather World Dye Colorant, and Leather World Finishing Conditioner, all available at http://www.leatherworldtech.com/Prod...productid=DLRK
A good quality paint brush and several disposable brushes
A craft store compressed-air paint sprayer
Several grades of sandpaper (from 200 to 400 grit)
Painters tape
Soft, lint-free cloths
Assorted tools to remove and disassemble the seats (16mm socket, torx bits, screwdrivers.

Seat removal;

Removing and disassembling the seats is the way to achieve the best results. You can try doing this with the seats in the car, but it will be a lot more difficult to achieve the same results.

1. Disconnect the battery to prevent the dreaded SRS Airbag warning light. (Wait at least 15 minutes before unplugging the wires from under your seats.)
2. Remove the headrest from the seat. It will pull right out, but could require some force. This can be done easiest by getting in the back seat and pulling the headrest off (don’t hit yourself in the face!).
3. Unbolt the 2 16mm rear bolts and the 2 16mm front nuts that hold the seat rails to the floorboards.
4. Tilt the entire seat assembly back to expose the electrical connections, and unplug all the connectors (Airbag sensor, seat belt receptacle, seat heater wiring, etc.). Now you are free to remove the seat from the car, but be careful, as they are heavy and awkward.

Seat Disassembly;

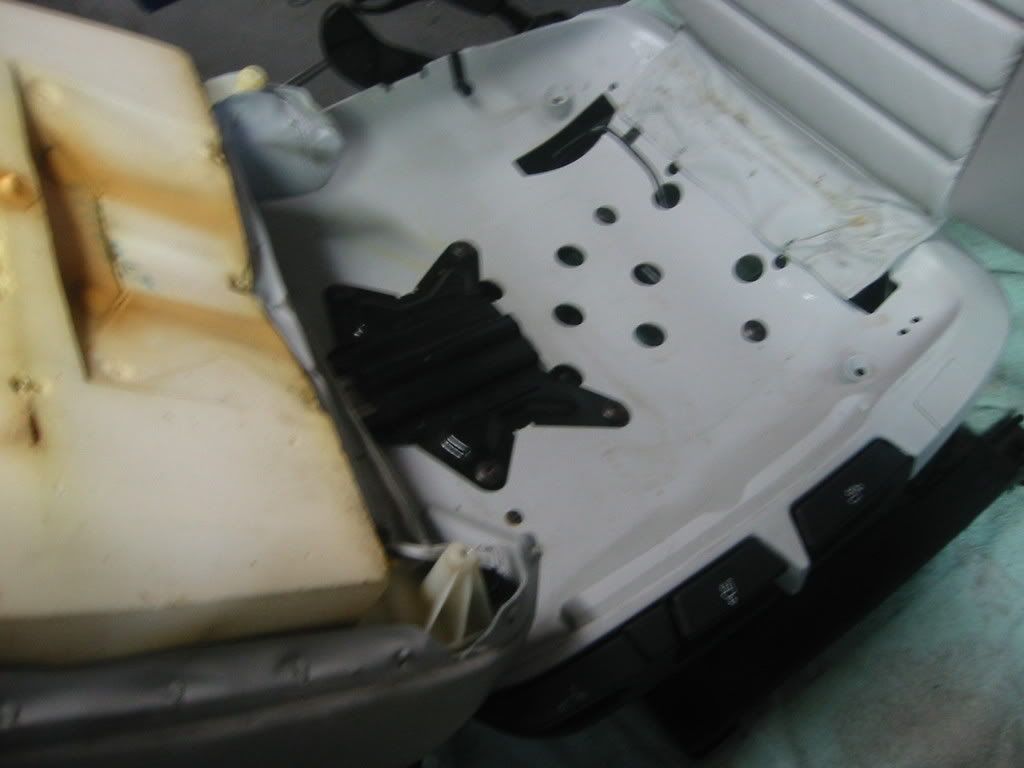
1. To remove the lower seat section off the seat frame, remove the 2 Torx screws on the front and 2 plastic pins in the back (which I just broke off, as the pins are not designed to come out).

2. There are 4 more Torx screws holding the extendable thigh support to the lower seat frame, which also need to come off. Flip the lower seat section upside down toward the front of the seat to expose and remove those screws, then lift out the entire lower seat section.
3. I also removed the back clamshell from the seats during this process. This is held in place with the headrest (already removed), two torx screws on the lower corners of the seat back, and the side lever(s) that flip the seat forward. The side levers and trim are both just pop off items, done carefully with a small, thin flathead screwdriver or prybar. Both should come straight out. (If the Bowden release cable is broken, now is the time to replace that, since you have full access.)

The lower section of the passenger side in my ti had split two seams and was hard as a rock, but still salvageable… Here’s what I did to restore it;

1. Repairing the seam splitting...
Remove the lower seat section from the seat frame. Remove the 2 Torx screws on the front and 2 plastic pins in the back (which I just broke off, as the pins are not designed to come out. I replaced them with #13 sheetrock wall anchors and screws, so I could easily disassemble them at a later time).

There are 4 more Torx screws holding the extendable thigh support to the seat frame, which need to come off. Flip the lower seat section upside down toward the front of the seat to expose and remove those screws, then lift out the entire lower seat section.

Turn the seat over and you will see the pins that the leather is stretched over to hold it in place. For this repair, I un hooked the leather from the pins along both sides and around the front, leaving the leather attached with 3 pins in back and 4 in front. I then unwrapped the leather off the side bolsters to expose the seams that were split.


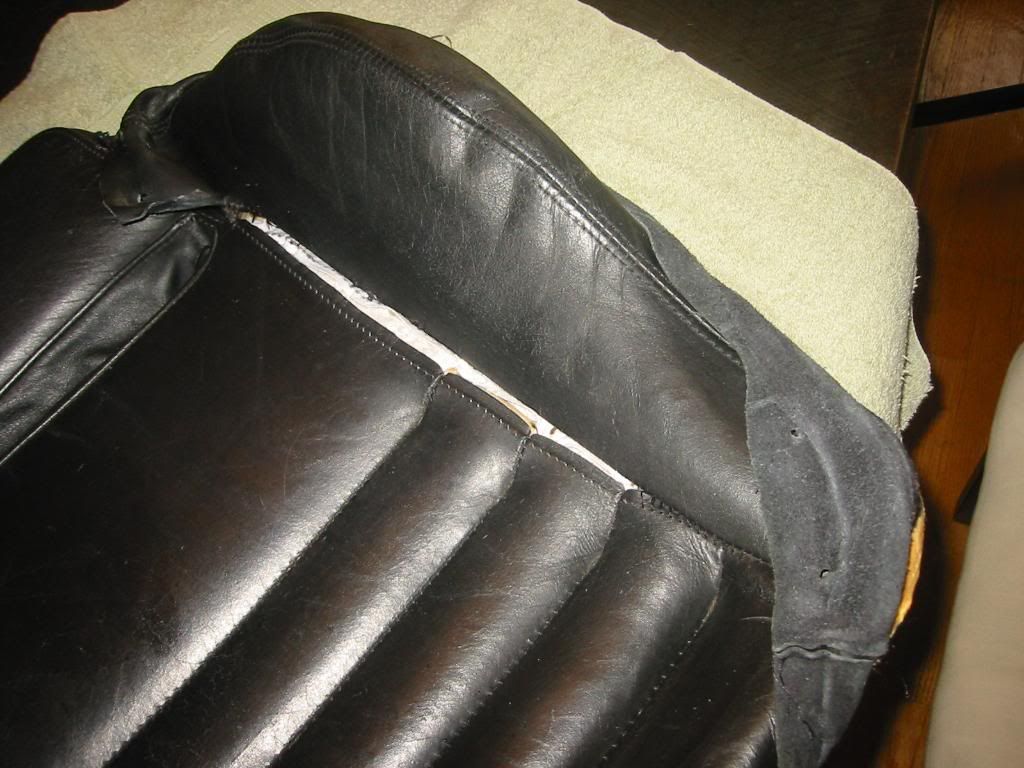
Using heavy duty nylon thread and a couple of different leather/mattress needles, I carefully restitched the seam using the existing holes in the leather from the original seam. Also there is a white fabric sleeve that holds a metal rod on the underside that needed to be attached to that seam as well. If I skipped one little stitch hole, it would show when I was done, so I had to be very thorough and careful. One side had completely split from front to back, and the other side had only split a few inches. This took me 2 or more hours just to re-stitch. (This is a case where I felt it was worth doing by hand, rather than taking to a shop to be machine re-stitched, as any more stitch holes would just further weaken the leather and it could tear after a short while.) Then I re-wrapped the leather over the seat to examine the results. Not bad, but there was still one more repair to do before re-attaching the leather.


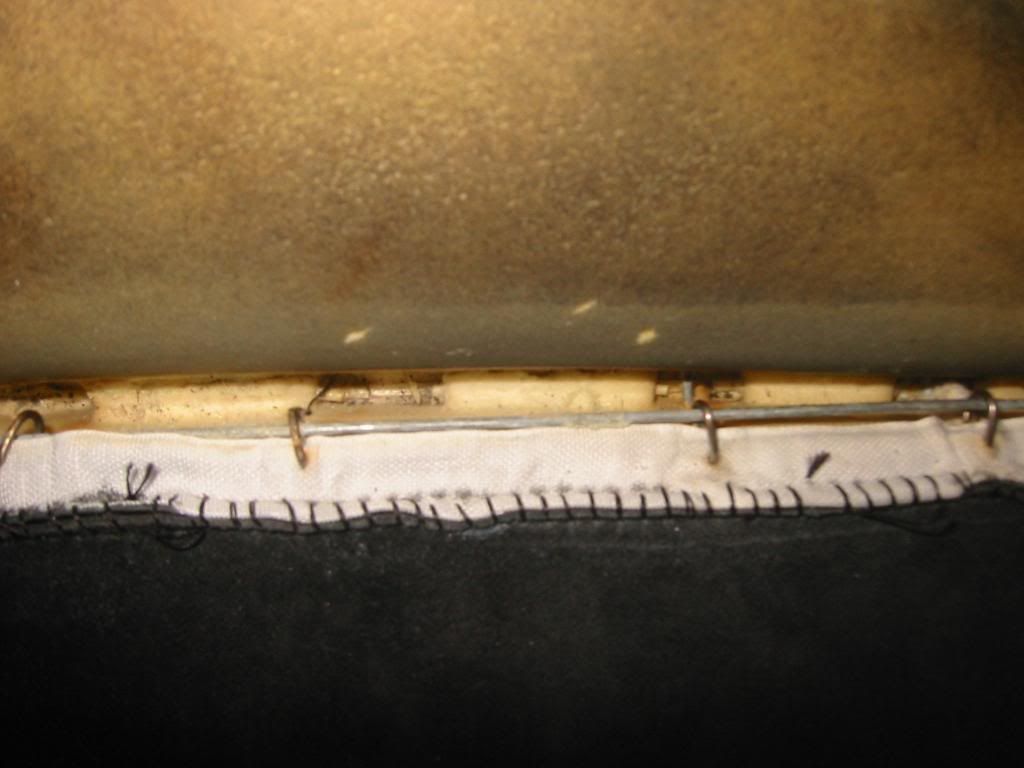
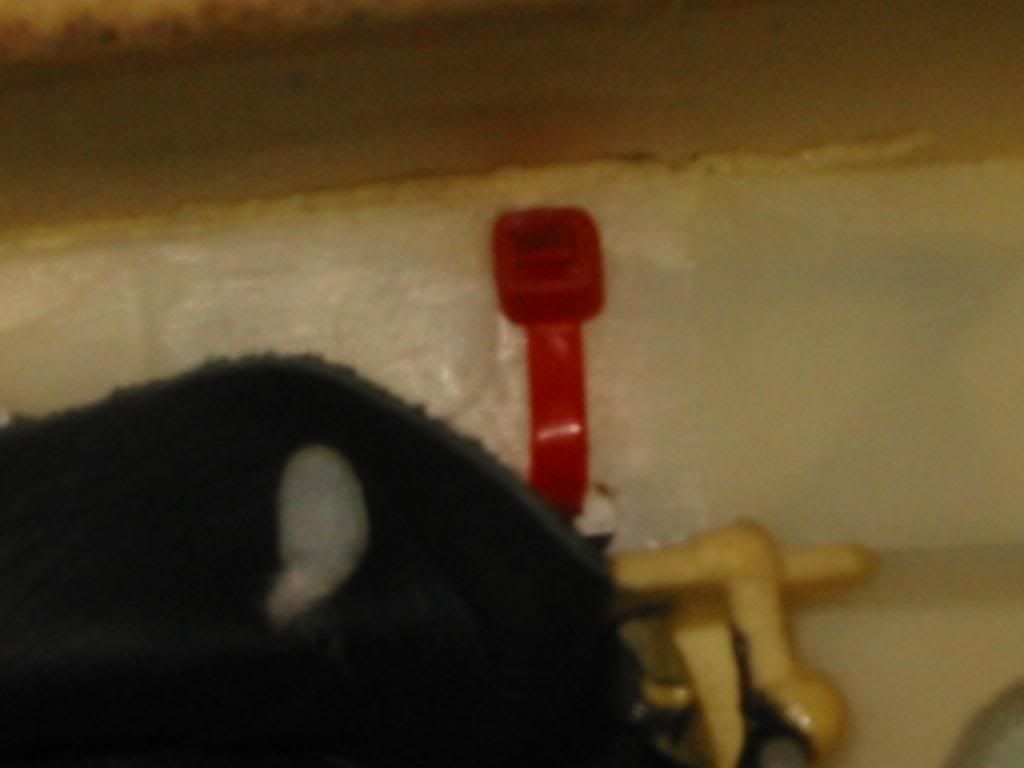
As you can see, the metal rod had been pulled out of the channel in the seat foam due to the hardening of the leather, and that had to be fixed. Using Zip-ties and Channel-Lok pliers, I pushed the rod (on both sides) back down into the foam and ran Zip-ties through the seat foam and tightened the ties (with the pliers) all the way, which pulled the rod back into place and somewhat restoring the original look of the seat.


2.
I have tried nearly every leather conditioner out there and the only thing that works to soften the leather is Lexol or Leatherique. Neither is cheap. But you get results. And it takes work. I tried applying the treatments to the seats according to the directions, but the black leather in my ti was too hard to absorb properly. Leatherique said that “Cardboard hard leather would require several treatments. I tried this process for 3 days, soaking and massaging the treatment into the seat, but no real results. The treatment only soaked in a little where the finish had cracked, so I decided to “break” the surface with sandpaper to get the treatment in so it could soften, and then I could re-surface the leather.
Tutorial Tools

  #1  
By wolferj-RIP on 03-12-2009, 12:24 AM
Default

Finished Repair on lower seat;

(more pics at this thread... http://318ti.org/forum/showthread.php?t=25597)

Refinishing the leather;

The dove seats in the coupe were very beat up and looked like they had never been cleaned. One of the upper side bolsters was completely worn down to the suede. The lower bolsters were also bad as were the headrests and thigh supports. There were also minor color variances between the seat parts, due to age and different dye lots. This meant a full re-color as well as re-finish. The black seats in the ti were older and had cracks, but the finish hadn’t worn through…

1. Prepping the seats for re-finishing involved getting all the dirt, oils and grime off, then prepping the surface. Mild dish or hand soap is good to get the surface clean, just don’t get the surfaces too wet. A damp cloth or sponge is all you need to clean with and then scrubbing the surface with a nylon scrub pad gets most grunge off and preps the surface. Then using a mild alcohol-based cleaner in a spray/spritz bottle, spray the surface and wipe clean. Once it’s completely dry, the leather is ready for re-finishing. I also taped off any area that wasn’t going to be re-finished (the M /// for example) with a good quality painters tape.


2. Using the flexible leather filler product, I started with the side bolster that was down to the suede. (The key here is to apply the filler in very light coats, and then sand the area in-between applications. I cannot repeat this enough. This will ensure you get good adhesion and a smooth finish.) The filler has the consistency of Elmer’s Glue and so I “painted” it on the seat using a disposable brush. It took at least 6 light coats of the filler to cover the sueded area of the leather, with a very light sanding between each coat. Always wipe the area down after each sanding to remove any dust or debris. Then I used the filler and “painted” the lower bolsters, the thigh rest, and filled in the creases and fine cracks, again with multiple light coats. Also, try not to get the filler on any stitches or seams, as it would fill them in and look poor. The filler goes on white, then dries clear, so be sure to look closely to ensure you have completely filled in the area you are working on.


3. The dye finish has a very thin and watery consistency, allowing for either a brush or spray application. The first coat should not completely color over the repaired area (if it does, you’re putting it on too heavy). It should be streaky and thin. Let each coat dry, wipe the area with a dry cloth, and then apply the next coat. (Again, be extra light on the seams, so they don’t get filled in.) I painted 3 to 4 light coats of color with a fine brush, and then finished with a spray coat, waiting about 15 minutes between coats (or until dry to the touch).


4. After the dye finish has cured for 24 hours, apply the finishing conditioner in light coats to the entire area, gently rubbing it in with a soft cloth.

Last edited by wolferj-RIP; 04-19-2010 at 05:34 PM..
Reply With Quote
  #2  
By wolferj-RIP on 03-12-2009, 12:29 AM
Default

I re-assembled the seats and here are the results:


Also, I had direct supervision by my supportive family;


The key is proper prep work, doing really light coats, and taking your time. I spent practically a whole day on just one seat, waiting for each coat of filler and finish to dry in between applications. If you try and rush through this, you will not get good results.
Reply With Quote
  #3  
By Will'sBimmer on 03-12-2009, 12:32 AM
Default

Very nice write-up. I am thinking of doing this to my seats some day. Maybe this summer when the weather is nice and warm. I like your supportive family. lol. cool dogs. I need to fill in my creases and cracks. So thanks for the write-up James.
Reply With Quote
  #4  
By wolferj-RIP on 03-12-2009, 12:47 AM
Default

I also refinished the steering wheel and repaired 2 damaged spots on my drivers door panel while I was at it;

Before;


After;


And now my interiors are complete! Also notice new LeatherZ console and door panel armrests....

And that is only 2 of the 5 dogs... I have a whole pack!

I took many more photos during this process, the whole bunch is here;
http://s287.photobucket.com/albums/l...ats/?start=all
Reply With Quote
  #5  
By Will'sBimmer on 03-12-2009, 03:15 AM
Default

Sweet!! I love the door armrests!!! I am so glad to see you got them installed. Don't you just love them? I notice my elbow on there all the time now.
Reply With Quote
  #6  
By wolferj-RIP on 03-12-2009, 04:15 AM
Default

Quote:
Originally Posted by Will'sBimmer View Post
Sweet!! I love the door armrests!!! I am so glad to see you got them installed. Don't you just love them? I notice my elbow on there all the time now.
I find myself consciously making sure I put my elbows on them...
Reply With Quote
  #7  
By Will'sBimmer on 03-12-2009, 04:17 AM
Default

Quote:
Originally Posted by wolferj View Post
I find myself consciously making sure I put my elbows on them...
Lol. Hilarious. I can't lie I do as well.
Reply With Quote
  #8  
By 96cali on 03-12-2009, 05:00 AM
Default

This is exactly what I love about the 'org. Nice writ up wolferj and thanks. I need to do a minor pre-emptive repair to my driver seat. I'll PM you for some advice.
Reply With Quote
  #9  
By wolferj-RIP on 03-12-2009, 05:27 AM
Default

Quote:
Originally Posted by 96cali View Post
This is exactly what I love about the 'org. Nice writ up wolferj and thanks. I need to do a minor pre-emptive repair to my driver seat. I'll PM you for some advice.
No problem! Everyone, please feel free to send me a message if you have any questions or want help/advice with this.

I am very happy that we share info and experience here. I have learned so much, and am thrilled to contribute.
Reply With Quote
  #10  
By pnosker on 03-12-2009, 07:21 AM
Default

So which armrests are those? Z3?
Reply With Quote
  #11  
By wolferj-RIP on 03-12-2009, 07:24 AM
Default

Quote:
Originally Posted by pnosker View Post
So which armrests are those? Z3?
Yes, they are the Z3 armrests and Z3 MarkII console armrest from LeatherZ.com (currently on sale!).
Reply With Quote
  #12  
By CATELUS on 04-16-2010, 08:10 AM
Default

Hey Wloferj,

Would you be able to let me know in abit more detail how you redid your steering wheel?

Mine's due for a fresh'ning.
Reply With Quote
  #13  
By wolferj-RIP on 04-19-2010, 05:42 PM
Default

Quote:
Originally Posted by CATELUS View Post
Hey Wloferj,

Would you be able to let me know in abit more detail how you redid your steering wheel?

Mine's due for a fresh'ning.
It was basically the same process as the seats.

1. Serious cleaning / de-greasing.
2. Prep. Light sanding with coarser paper, then finer grit, and finish with very fine grit. Clean all areas well, leaving no fuzz or dust.
3. Filled the pitted areas with the filler product, then a top coat of the filler for an even surface.
4. Very light sanding of the filler product after it cured for a smooth finish. I used a scouring pad for all my final finish sanding.
5. Brush on the dye in several light coats.

Good luck!
Reply With Quote
  #14  
By CATELUS on 04-30-2010, 07:13 AM
Default

Quote:
Originally Posted by wolferj View Post
It was basically the same process as the seats.

1. Serious cleaning / de-greasing.
2. Prep. Light sanding with coarser paper, then finer grit, and finish with very fine grit. Clean all areas well, leaving no fuzz or dust.
3. Filled the pitted areas with the filler product, then a top coat of the filler for an even surface.
4. Very light sanding of the filler product after it cured for a smooth finish. I used a scouring pad for all my final finish sanding.
5. Brush on the dye in several light coats.

Good luck!
Awesome.
Thanks for the feedback.
Just another question about it.
Did you sand back the whole wheel to give it an even finish or just the affected area?
Reply With Quote
Comment

Bookmarks


Currently Active Users Viewing This Tutorial: 1 (0 members and 1 guests)
 
Tutorial Tools
Display Modes

Posting Rules
You may not post new threads
You may not post replies
You may not post attachments
You may not edit your posts

BB code is On
Smilies are On
[IMG] code is On
HTML code is On

Forum Jump

Similar Threads
Tutorial Tutorial Starter Category Comments Last Post
Leather Seat Refresh wolferj-RIP Leather/Vinyl Care 12 02-17-2009 06:22 AM
WTB: black leather Drivers seat or black sport seat project318TI US and North America 1 11-17-2008 03:35 PM
WTB: Drivers leather gray seat VROOMCP US and North America 0 10-15-2008 11:52 PM
WTB: Black leather rear seat bonbonb US and North America 0 11-19-2005 10:41 PM
seat material - leather, vinyl, or what? crewboy04 Leather/Vinyl Care 9 09-01-2004 09:09 PM


All times are GMT +1. The time now is 11:20 AM.


.
Powered by site supporters
vBulletin Version 3.8.8
Copyright ©2000 - 2024, Jelsoft Enterprises Ltd.
Copyright ©1999 - 2024, 318ti.org

Tutorial powered by GARS 2.1.8m ©2005-2006
© vBadvanced CMPS v3.2.2
[page compression: 99.12 k/129.88 k (23.68%)]

318ti.org does not warrant or assume any legal liability or responsibility for the accuracy, completeness, or usefulness of any information or products discussed.