CoolJess76 has a great thread on a permanent window fix. I used his thread when my drivers side power window failed last year. However my window regulator was too bent and even after straightening it out, the C clips kept popping off so it was time to replace the window regulator. The following is a short tutorial on how to replace just the window regulator.
For this job you will need a new window regulator part # 51-33-1-977-609-M9 (Left) or 51-33-1-977-610-M9 (Right), ¼ inch drill bit, a T-30 Torx bit or wrench, 4 - M6 hex head bolts with corresponding washers & nuts. In addition youll also need the other tools needed for steps 1 7 of CoolJess76s permanent window fix tutorial.
Even though it is stated in the above referenced thread it bears repeating the following: WARNING!!!
If you have side-impact air bags, DISCONNECT YOUR BATTERY and wait approximately 30 minutes before starting this procedure. DO NOT reconnect the battery while the airbag is disconnected as this will trigger an SRS light that requires a special tool to reset. To avoid death, serious injury, or damage to the vehicle, NEVER work in the vicinity of an un-deployed airbag. Only after the airbag is completely removed and placed in a safe location away from you and the vehicle, is it safe to perform work on that part of the vehicle. While my intentions are to save you guys money by fixing your own cars, the last thing I want is for someone to get hurt. Let's stay safe guys, your health isn't worth saving a couple bucks!
1. Disconnect the 2 plugs connected to the window (flat) motor.
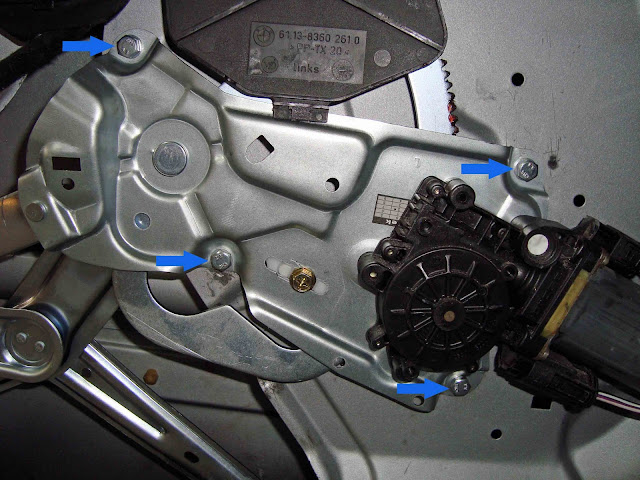
2. Drill out the 4 rivets (see 4
blue arrows) using the ¼ inch drill bit.

3. Remove the single (10mm) bolt holding the window regulator to the door (lower left side drivers side, lower right on the passenger side).
4. The window regulator (and motor) should now be free.
5. Vacuum out the drill borings in and around the door.
6. Remove the motor from the old window regulator using the T-30 Torx bit or wrench.
7. NOTE: Be sure to replace the (plastic or metal) circular sleeve where the motor attaches to the new window regulator (see the single
blue arrow) before attaching the motor to the new window regulator.

8. Apply some fresh grease to the motor spindle and attach the window motor to the new window regulator (see 3
green arrows in photo above) Tightening torque is 5 NM.
9. Reattach the window regulator to the door with the 4 M6 hex head bolts, washers & nuts (see 4 blue arrows) and the one pre-existing 10mm bolt. Tightening torque is 9 NM.
10. Reattach the lift arms to the plastic sliders and test. If after following steps 10e & 10f in the permanent window fix tutorial every thing looks good, install your C clips and put everything back together.
I hope this helps. If you have any questions or you think I left something out, please let me know. Thanks to CoolJess76 for his permanent window fix write up as he has done the bulk of the work in that tutorial!


 Threaded Mode