318ti.org forum

Go Back   318ti.org forum > Technical, Maintenance and Modifications > Knowledge Base

Notices

Knowledge Base How to articles and things explained.

.
» Recent Threads
FS: Racing Dynamics RGR...
05-24-2024 03:29 AM
Last post by 7Senna8
05-24-2024 03:29 AM
0 Comments, 842 Views
My 318ti build
05-21-2024 04:48 PM
Last post by Jclare318ti
05-21-2024 04:48 PM
0 Comments, 1,361 Views
Comment Share/Bookmark
 
Tutorial Tools Display Modes
5 1/4" replacement rear speakers
Published by stirlsilver
03-14-2010
Default 5 1/4" replacement rear speakers

Ok, so one of my rear speakers had a blown voice coil, and I got sick of the rattling that occured on the lower frequencies.

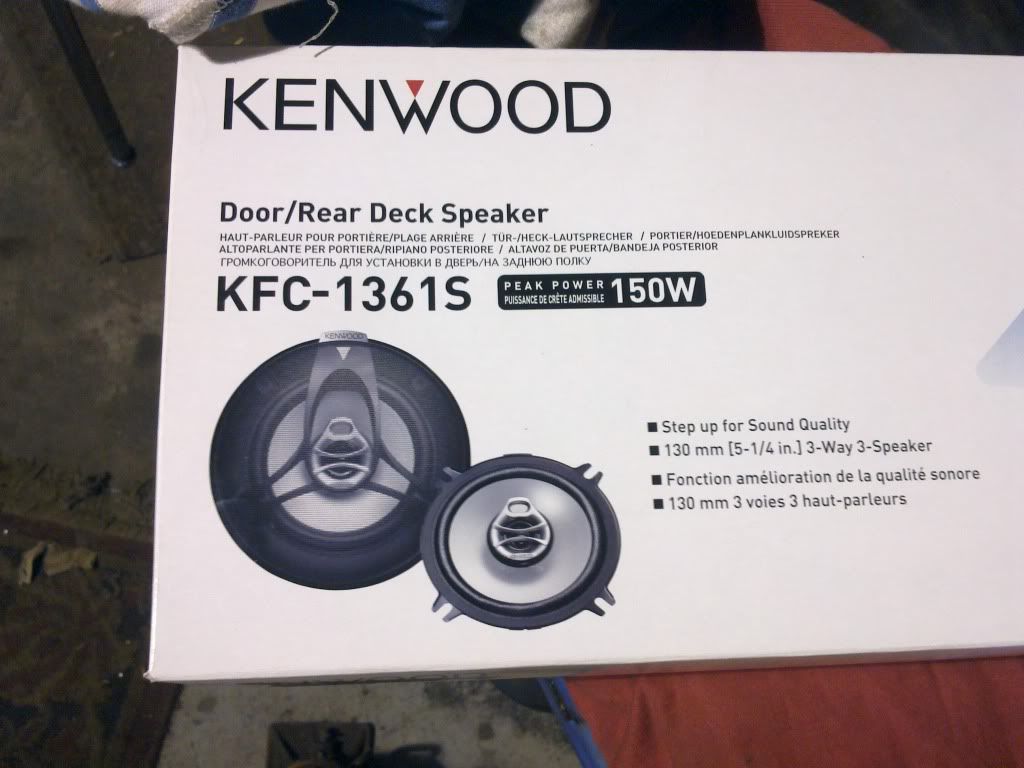
Anyway I decided to do something about it, obviously it isn't really possible to find aftermarket speakers that fit straight in. I haven't gone with anything flash with the speakers, at the end of the day I still have the stock head unit. The replacement speakers I got were Kenwood 5 1/4" 3 way speakers.

Parts used:
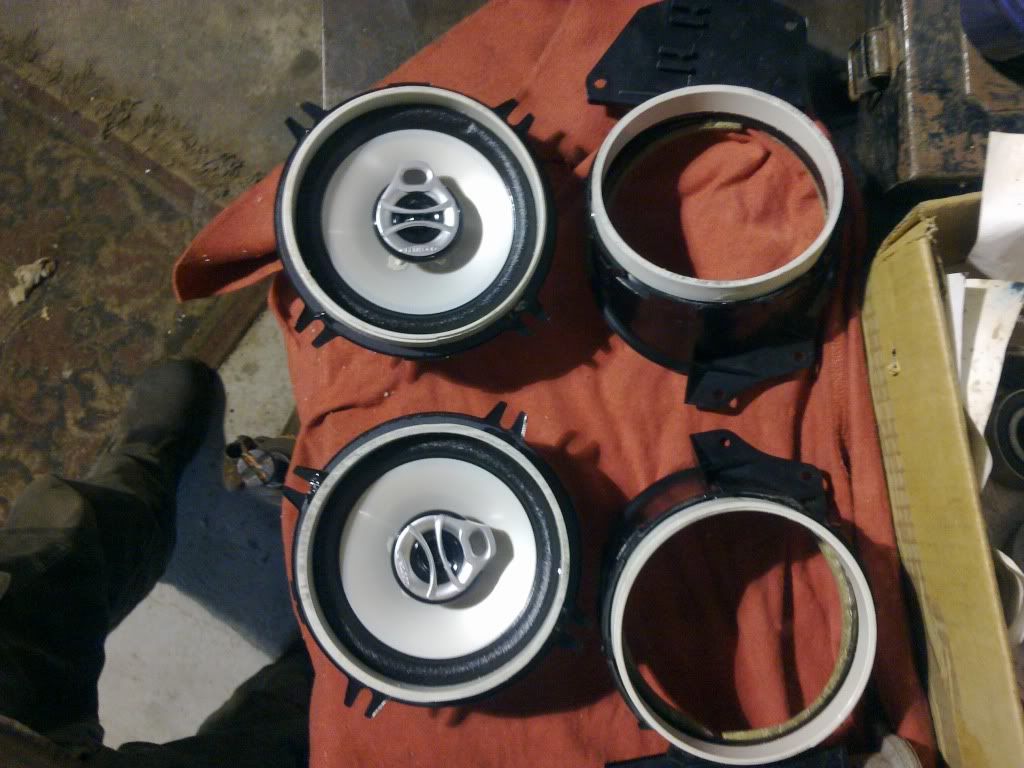
The original mounting brackets that screw on to the underside of the speaker grills.
Replacement 5 1/4" speakers
A 100mm PVC bend that has both the male & female ends on it (I used a 90deg elbow)
5 minute araldite
Silicone
Hack saw or band saw
4 small screws
coarse sand paper

The major bits:


The speakers, nothing flash here:


The PVC elbow (note how it has a male and female fitting):


The original mounting brackets:


Ok first up you cut off two rings each 15mm deep of either side of your fitting, here you can see the markings for the first set of rings:


I had a band saw in the workshop which made cutting the rings a little easier, but you could do it with a hack saw also. Here are two male rings and two female rings. All 15mm deep:

Tutorial Tools

  #1  
By stirlsilver on 03-14-2010, 12:58 PM
Default

Next came the gluing of the components, it is a good idea to key all components that are to be bonded with sand paper, PVC and the original mounting frames have quite a smooth surface finish which araldite can have issues bonding to. So with some coarse sand paper you can roughen the bonding surfaces and get a stronger joint.

The small diameter (male) rings are bonded to the original speaker frames, I used small strips of araldite in 4 locations to join the PVC ring to the plastic frame:


In a similar fashion, the large diameter (female) rings were bonded to the face of the speakers. Here I smeared the araldite over the complete bonding face of the PVC ring and then mated the two pieces together. As you can see the ring is only just big enough to clear the mouting rubber of the speaker cones. You have to be very careful not to get any glue on the rubber otherwise you will stiffen it affecting the performance of the speaker:


Here we see the speakers and frames ready to be mated together:


Because the cuts of the rings were not perfect there was some very thin gaps between the rings and frames. So I used some silicone and went all around to seal up any possible air gaps. This probably wasn't necessary as the gaps were very small. Because there is a chance I may need to change the speakers in future, what I did was instead of gluing the PVC pieces together, I drilled two small holes and screwed in two self tapping screws to hold the pieces together.

Reply With Quote
  #2  
By stirlsilver on 03-14-2010, 12:59 PM
Default

And that's it, all done:


Reply With Quote
  #3  
By Mr.Squeelerz on 03-14-2010, 05:02 PM
Default

Very interesting. How does it sound?
Reply With Quote
  #4  
By stirlsilver on 03-23-2010, 05:24 AM
Default

Well, considering I am still running the stock head unit it sounds quite good. Although it is quite hard to do a comparison with this setup versus the original because I went for about a month without rear speakers.

If you wanted to be really picky, I would say that if tweeters were to be used on the rear speakers, they should be remote mounted directly on the parcel shelf for better acoustics since high frequencies really need to be pointed directly at the listener. At the moment, when you fade the sound completely to the back, it sounds to me that because the speakers are essentially mounted inside a tunnel, the lower frequencies of the woofers are distorting the high frequencies produced by the tweeters. It is also possible that it is simply being caused by the stock head unit... except you don't notice it from the front tweeters. So i'm not exactly sure, i'm thinking it's more the tunnel effect though.

Anyway, i'm quite happy with it and the distortion of the tweeters can't be noticed at all when you have the sound properly faded and balanced.

One thing I should point out, is that if you decide to use this method to mount some speakers, make sure to check how much space you have between the speaker and the belt tensioner. Mine fit with about 1mm of gap between the speaker basket and belt tensioner (phew!).
Last edited by stirlsilver; 03-23-2010 at 05:27 AM..
Reply With Quote
  #5  
By cmoore on 08-20-2012, 02:29 PM
Default real nice solution

i know this post is a few years old, but i have seen several replacement speaker mounts in a TI and i really like this one. All the others tend to mount the speakers flat on the underside of the rear trays. But all that does is point the speaker into the underside of the rear hatch. i have been mulling this over for weeks how to get some sound from the rear. From 6x9 custom boxes in the corners to a new sub in the rear, or butchering the rear tray.

And for the record, a 90degree PVC elbow with male and female parts is called a street elbow.
Reply With Quote
  #6  
By zoner on 08-20-2012, 04:29 PM
Default

...Or you can just buy these and save yourself a day+ of fabrication.
Reply With Quote
  #7  
By cmoore on 08-20-2012, 04:47 PM
Default angled toward front

i assume that those brackets just mount the larger speaker flat to the underside of the rear shelf. Am i wrong? call me crazy, but it seems like there would have to be some benefit to the sound being directed a bit more forward vs being sent directly into the underside of the rear hatch? Probably way to much to expect, but for someone to have installed or listened to it installed both ways and been able to comment.
Reply With Quote
  #8  
By zoner on 08-20-2012, 05:12 PM
Default

Yes, they do mount flat compared to the slight forward angle of the factory setup, but I am running component drivers in this location and direction is less of an issue with lower frequencies. I have the factory 10-speaker system and the tweeter, which is directional, is sitting right on top of the speaker plate and is unchanged.

I think that the benefits of a larger driver in this location outweigh the directional issue.
Reply With Quote
  #9  
By cmoore on 08-21-2012, 02:25 PM
Default

Is that the exact ebay item? There are a few (liquid ice seller) ebay items listed for bmw's but all seem to be listed for other models or later years. i am okay "making it work" but if there is an exact fit part, its obviously worth it to get that specific part. I plan to order today. Thanks for a response.
Reply With Quote
  #10  
By Uber E30 on 08-21-2012, 04:05 PM
Default

Yes, SAK-1203
Reply With Quote
  #11  
By cmoore on 08-21-2012, 04:10 PM
Default

great, thanks.
Reply With Quote
  #12  
By zoner on 08-21-2012, 05:58 PM
Default

The only thing you need to be careful of when using these adapters is to not get a speaker with too large of a magnet- it will cause clearance issues with the seat belt assembly in that area.
Reply With Quote
  #13  
By cmoore on 08-21-2012, 06:12 PM
Default

Well i picked up a set (4) of the HK OEM speakers for other e36/z3 models which i got thrown in when i bought a replacement c33. (my originals were long gone as well as the original brackets). i was going to start with those that assuming that it might have a decent chance of fitting. If not, i'll go with the MB qt's i guess or other recommended options.
Reply With Quote
Comment

Bookmarks


Currently Active Users Viewing This Tutorial: 1 (0 members and 1 guests)
 

Posting Rules
You may not post new threads
You may not post replies
You may not post attachments
You may not edit your posts

BB code is On
Smilies are On
[IMG] code is On
HTML code is On

Forum Jump

Similar Threads
Tutorial Tutorial Starter Category Comments Last Post
6 1/2" speakers in stock rear bracket Flametail Knowledge Base 28 09-24-2021 04:32 AM
FRONT SPEAKERS 4" to 6.5"!!! Nitro Nollie Interior and ICE 11 09-24-2021 04:21 AM
rear speakers replacement tiFreak Interior and ICE 17 07-05-2009 05:17 PM
Passenger Trim and rear quarter,ash tray, and rear 4 inch speakers m44bimmer US and North America 1 09-23-2005 05:37 AM
'98 318ti "M" airdam grill replacement Ridge Runner Exterior 1 09-10-2004 08:45 PM


All times are GMT +1. The time now is 09:24 PM.


.
Powered by site supporters
vBulletin Version 3.8.8
Copyright ©2000 - 2024, Jelsoft Enterprises Ltd.
Copyright ©1999 - 2024, 318ti.org

Tutorial powered by GARS 2.1.8m ©2005-2006
© vBadvanced CMPS v3.2.2
[page compression: 82.73 k/111.35 k (25.70%)]

318ti.org does not warrant or assume any legal liability or responsibility for the accuracy, completeness, or usefulness of any information or products discussed.